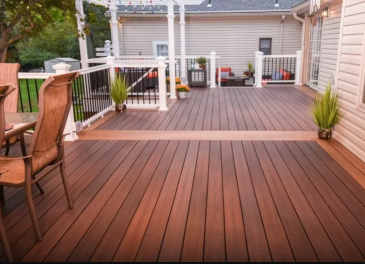
Deck Refinishing Near Me: Expert Local Services for Long-Lasting Results
If your deck looks weathered or feels rough underfoot, you can restore its appearance and protect your investment without guessing at every step. For most homeowners, hiring a local deck refinishing near me who power washes, sands, and applies a durable oil-based stain will deliver the quickest, longest-lasting results.
You’ll learn what the refinishing process actually involves, how pros handle repairs and coatings, and which questions to ask when comparing local contractors. This guide shows you how to spot quality work, avoid common pitfalls, and decide whether a DIY approach or hiring “deck refinishing near me” is the smarter choice for your schedule and budget.
Deck Refinishing Process
You will inspect the deck refinishing for structural issues, prepare the surfaces by cleaning and sanding, then apply stain and sealer chosen for your wood and climate. Each step affects durability and appearance, so follow the sequence and timing closely.
Inspection and Assessment
Start by checking joists, ledger, posts, and railings for rot, loose fasteners, and signs of water damage. Probe suspect areas with a screwdriver and look for soft spots; replace any joist or board that gives way more than a fingertip push.
Measure board spacing and note areas with trapped debris or poor drainage—these influence drying time and the type of finish you should use.
Record the wood species (e.g., pressure-treated pine, cedar, redwood) and its age. That determines whether you need a brightener, oil-based vs. water-based stain, or a penetrating oil versus film-forming sealer.
Make a short written plan: list boards to replace, fasteners to tighten or swap for stainless/galvanized, and estimated drying windows based on forecasted temperature and humidity.
Surface Preparation
Begin with debris removal: sweep, vacuum between boards, and pull plant growth. Then power-wash at 500–1200 psi to remove dirt and old flaking finish; keep the nozzle 8–12 inches away to avoid gouging wood.
Allow the deck to dry 24–48 hours depending on weather. Use a deck cleaner or oxygen bleach for mildew or gray weathered wood; follow product dwell times and rinse thoroughly.
Sand areas with remaining finish or rough spots using 80–120 grit for hardwoods and 60–80 grit for softwoods; feather edges where old finish meets bare wood. Replace any rusted nails with screws and trim board ends where splitting prevents proper sealing.
Mask adjacent surfaces and protect plants. Confirm the deck is fully dry and test a small area with your chosen stain to check absorption and color.
Staining and Sealing
Choose a stain compatible with your wood and local climate: transparent/sem-transparent for natural grain, solid for heavy UV protection. Read the manufacturer’s recoat and cure times.
Apply stain with a brush or roller for controlled coverage; use a sprayer for large, flat areas but back-brush immediately to ensure penetration and even color. Work in small sections with the grain and maintain a wet edge to avoid lap marks.
After staining, allow the recommended dry time—usually 24–48 hours—then apply a sealer or topcoat if the stain requires it. For oil-based stains, use oil-based sealers; for water-based stains, use compatible water-based finishes.
Inspect for missed spots and apply a second thin coat where absorption varied. Note cure times before furniture placement: typically 48–72 hours for light use and up to 7 days for full chemical cure.
Choosing Professional Deck Refinishing Near Me
You’ll learn what expert refinishing delivers, how to vet local companies, and how to compare written quotes and services so you can hire with confidence. Focus on contractors who inspect the deck, provide clear timelines, and show proof of insurance and references.
See also: Custom Home Builder Toronto: Expert Design-Build Services for Luxury Homes
Benefits of Expert Refinishing
Hiring a professional preserves your deck’s structural integrity and extends its service life. Pros identify hidden rot, loose fasteners, and drainage problems that DIY sanding often misses.
You’ll get proper surface preparation — power washing, detailed sanding, and mildew treatment — before any stain or sealer is applied. That reduces peeling and uneven color and improves adhesion for longer-lasting protection.
Professionals also match products to wood type and local climate. Expect manufacturer-grade stains, correct application thickness, and warranty options that most homeowners can’t access on their own.
How to Select a Trusted Local Service
Start with at least three local contractors and check online reviews plus recent photo portfolios. Contact references and ask about cleanup, punctuality, and whether the crew corrected unexpected issues.
Verify licensing, insurance, and written warranties before you agree to work. Request a site visit so the contractor can assess rot, fastener condition, and necessary board replacement rather than quoting sight-unseen.
Ask specific questions: which brand and product will you use, how many coats, dry times, and what prep steps they’ll perform. Get a detailed scope of work that lists materials, labor, and protection measures for nearby landscaping and siding.
Comparing Quotes and Services
Compare quotes line by line: prep work, repairs, stain or sealer brand, number of coats, and cleanup. Cheaper bids often skimp on prep or use lower-grade products that need repeat work within a few years.
Use a simple checklist to score each bid:
- Scope clarity (yes/no)
- Product brand named (yes/no)
- Written warranty (duration)
- Timeline start/end dates
- Payment schedule and deposits
Choose the quote that balances clear scope, reputable products, and realistic timelines. Favor contractors who offer a signed contract, proof of insurance, and a final walk-through checklist showing completed prep and finish steps.